How to Change Your Cabin Filter in Simple Steps?
Changing your Cabin Filter is essential for maintaining air quality inside your vehicle. This small but crucial component can significantly impact your driving experience. A clean cabin filter allows fresh air to circulate and keeps out dust, allergens, and pollutants. It's surprising how often we overlook this simple task.
Many people may not even know when to change their cabin filter. Some sources suggest replacing it every 12,000 to 15,000 miles, but your specific usage can vary. For example, if you often drive in urban areas with heavy traffic, you might need to replace it more frequently. Ignoring this maintenance can lead to bad odors and reduced airflow from your air conditioning system.
Taking the time to change your cabin filter is rewarding. It might seem like a small detail, yet it plays a big role in your comfort. Consider it an opportunity to reconnect with your vehicle. Organizing this task also opens up a chance to inspect other components in your car. Keeping it clean takes effort, but it is worth it for a healthier ride.
Understanding the Importance of a Cabin Filter
The cabin filter plays a vital role in your vehicle's air quality. It filters dust, pollen, and pollutants. Without a clean filter, harmful particles enter the cabin. Over time, this can lead to allergy symptoms or other respiratory issues. It's easy to overlook, but neglecting it can impact your comfort and health during drives.
Tips: Regularly check your cabin filter every 12,000 to 15,000 miles. If you notice reduced airflow from the vents, it might be clogged.
A dirty cabin filter can also produce unpleasant odors. Trapped moisture can lead to mold growth, causing a musty smell inside your car. This is not just unpleasant; it poses health risks. Replacing the filter ensures fresh air, making your rides more enjoyable.
Tips: When replacing your cabin filter, follow the owner's manual. Consider the climate you live in; dusty areas may need more frequent changes.
Identifying the Right Cabin Filter for Your Vehicle
When it comes to changing your cabin filter, the first step is identifying the right one for your vehicle. Every car model has a specific filter size and design. You can often find this information in your owner's manual. If you don’t have it, many auto parts stores have online databases. Just enter your vehicle's make and model.
Sometimes, the filter may look different from what you expect. Don’t panic; just make sure it matches the dimensions specified in your manual or online. Tips: Always compare the old filter with the new one before installation. Pay attention to the airflow direction marked on the filter.
The cabin filter functions to cleanse the air entering your vehicle. A dirty filter can lead to poor air quality. Remove it regularly. Here’s a tip: Check your cabin filter every 12,000 miles, or twice a year. It’s easy to forget, yet essential for comfort. If you’re unsure, don’t hesitate to ask for help. You may find it’s not as complicated as it seems. Just take your time.
How to Change Your Cabin Filter in Simple Steps? - Identifying the Right Cabin Filter for Your Vehicle
| Vehicle Make | Model Year | Cabin Filter Part Number | Estimated Replacement Time |
| Toyota | 2015 | 87139-0E010 | 20 minutes |
| Honda | 2018 | 80292-T2A-A01 | 15 minutes |
| Ford | 2020 | FL3Z-19N619-A | 30 minutes |
| Chevrolet | 2019 | 23275869 | 25 minutes |
| Nissan | 2017 | 27277-6S000 | 20 minutes |
Necessary Tools for Changing Your Cabin Filter
Changing your cabin filter is a straightforward task. However, you’ll need some essential tools to do it right. Start with a flathead screwdriver or a pair of pliers. These can help you reach tight spots and remove any necessary covers. A small flashlight may also come in handy. It can illuminate dark areas in your vehicle, ensuring you don’t miss any details.
Gathering these tools is just the beginning. You might also consider wearing gloves. This will keep your hands clean while handling dust and debris. A vacuum cleaner can be useful too. It helps remove any loose dirt from the filter area before you install a new one. If you're feeling uncertain about each step, that's okay. Experimenting with different tools can lead to better results. Sometimes, the simplest tools work best. Always take a moment to review your steps. It could save you time and frustration in the long run.
Cabin Filter Change Frequency and Impact on Air Quality
Step-by-Step Guide to Remove the Old Cabin Filter
Changing your cabin filter is essential for maintaining clean air inside your vehicle. A clogged filter can reduce air quality by trapping dust, pollen, and other pollutants. Studies indicate that up to 50% of cars on the road have a neglected cabin filter. This can lead to discomfort and even health issues for passengers.
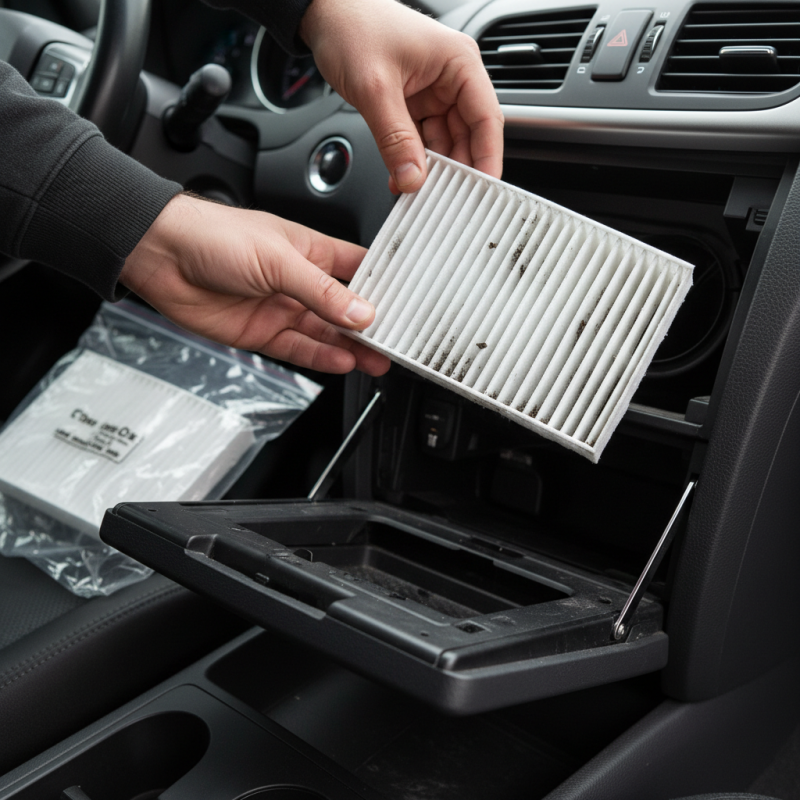
To remove the old cabin filter, start by locating the filter compartment. This is usually beneath the glove box or in the footwell area. Carefully remove any panels obstructing access. Pull out the old filter with caution. Expect some debris and dirt—you might be surprised at how grimy it can get.
Tips: Wear gloves to keep your hands clean. It’s recommended to change the filter every 12,000 to 15,000 miles, or at least once a year. While the process is straightforward, it’s common for people to overlook it. If you struggle with the removal, don’t hesitate to consult a trusted source.
Installing the new filter is just as crucial. Ensure it faces the correct direction, indicated by arrows on the filter. A common mistake is reversing the airflow direction.
Pay attention to details during this process; it can significantly affect air quality. Installing the New Cabin Filter and Final Steps
Installing a new cabin filter is an essential part of vehicle maintenance. Start by locating the filter compartment, usually found behind the glove box. Remove any screws or clips holding the cover in place. It may feel awkward, but don’t worry if you struggle a bit. This step can be tricky, especially if you’ve never done it before. Take your time and remember where each piece goes.
Once you’ve reached the old filter, carefully pull it out. You might notice dust and debris. It’s a clear sign that a replacement is needed. Now, grab your new cabin filter. Ensure that it fits snugly in the compartment. Align any specific markings on the filter with the airflow direction indicated. It’s frustrating if you accidentally install it backward. After putting everything back together, check if all screws and clips are secure. A loose cover can lead to unwanted noises. Verify that the glove box opens and closes smoothly. This final check can save time and discomfort later on.