

How to Pull Out an Ironing Board Drawer?
Removing a Pull Out Ironing Board Drawer looks simple, but small mistakes can damage runners, screws, or the cabinet frame. The drawer may feel stuck because its release clips are hidden beneath the ironing surface. Some models use side-mounted levers. Others use rear stops or soft-close hardware.
Cabinetmaker and furniture-restoration consultant Elena Morris advises, “Treat the drawer like fitted furniture, not a stubborn box; support it before releasing the runners.” Her practical warning reflects years of handling compact storage systems. A calm inspection usually prevents unnecessary force.
Begin by clearing the ironing board and opening the drawer completely. Look beneath both runners for release tabs, levers, or locking clips. Keep one hand under the drawer front. Press the releases evenly, then pull the drawer forward with steady pressure. Do not twist it. That can bend the tracks.
A flashlight helps. So does a second person.
If the Pull Out Ironing Board Drawer still refuses to move, check for a hidden rear stop or a loose screw. Some instructions assume identical hardware, but that assumption can be wrong. Photograph the mechanism before removing anything. It gives you a useful reference during reinstallation.
This guide explains how to identify common drawer systems, release them safely, and reinstall them without misalignment. Expect minor differences between brands. Careful observation matters more than strength.
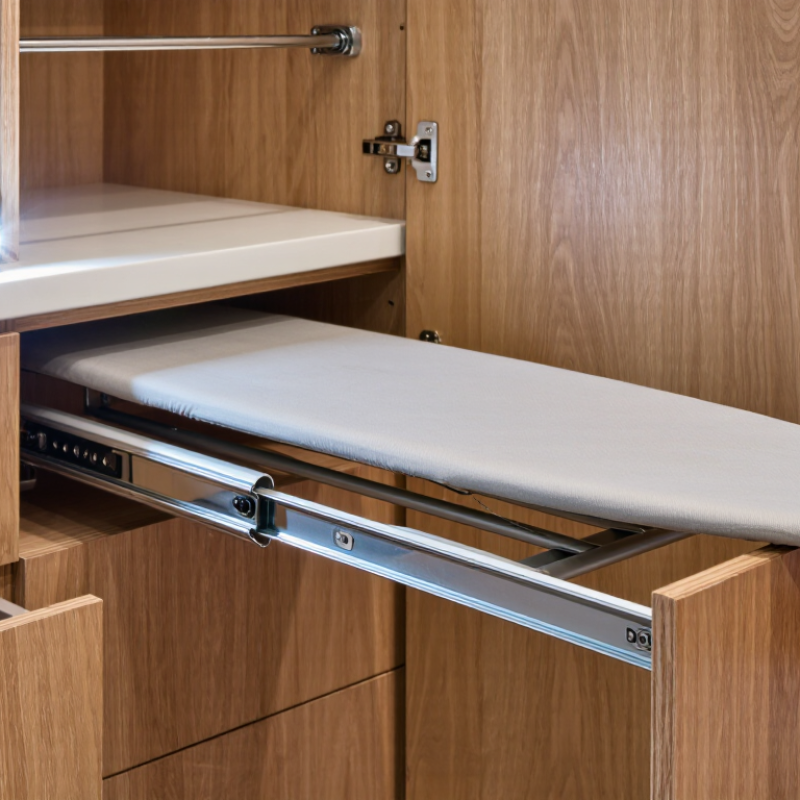
Identify the Slide Type and Check the Manufacturer’s Load Rating
Before pulling out an ironing board drawer, identify the slide type. Side-mounted ball-bearing slides usually show metal rails on both drawer sides. Undermount slides sit beneath the drawer and may have release levers. Center-mounted slides use one rail below the drawer. Friction slides often look simpler and may have no ball-bearing track. I have found that a partial extension can hide the release mechanism. Pull gently and inspect with a flashlight. Do not force it.
Check the manufacturer’s load rating before removing or reinstalling the drawer. The rating may cover one slide, a matched pair, or the complete drawer assembly. That difference matters. Add the board’s weight, the drawer weight, and every stored item. Leave a safety margin, especially when the drawer extends fully. ANSI/BHMA A156.9 evaluates cabinet hardware through durability and performance testing, while ISO 7170 covers strength and durability principles for storage furniture. These standards support careful testing, but they do not replace the slide maker’s specific rating. A 2023 furniture-fittings market review also noted that load performance and cycle durability remain major selection factors across residential storage products. Check the installation sheet, stamped rail markings, or technical data table. If no rating appears, treat the slide as unverified. That is inconvenient. Better cautious than bent rails. I once saw a drawer fail because its contents seemed light, but the long extension multiplied the pulling force. Recheck screw tightness and rail alignment after fitting.
| Slide Type | How to Identify It | Typical Clearance | Typical Published Load Rating* | Extension and Movement | Suitability for an Ironing Board Drawer | Removal Considerations |
|---|---|---|---|---|---|---|
| Side-Mount Ball-Bearing Slide | Metal slide members are visible along both drawer sides. The slide usually has a disconnect lever or release tab. | About 12.7 mm (0.50 in) per side; confirm the slide specification before removing the drawer. | Approximately 34–45 kg (75–100 lb) per pair for common light- to medium-duty designs. | Usually available in 3/4-extension or full-extension versions; movement is generally smooth and controlled. | Often suitable when the drawer carries a folding board and light accessories, provided the rating covers the fully loaded drawer. | Open the drawer fully, support its weight, press or lift both release levers as required, and pull the drawer forward evenly. |
| Side-Mount Roller Slide | A plastic or metal roller is visible near the front or rear of each slide. The hardware is simpler than a ball-bearing slide. | Commonly about 12.7 mm (0.50 in) per side, but some systems require a different gap. | Approximately 23–34 kg (50–75 lb) per pair for common cabinet applications. | Typically 3/4 extension; it may feel less rigid at full opening than a ball-bearing slide. | Suitable for a lightweight ironing board drawer when the board and accessories remain within the stated rating. | Many versions require lifting the drawer front slightly while pulling forward; avoid forcing the rollers past the stops. |
| Bottom-Mount or Center-Mount Slide | Most of the hardware is hidden below the drawer or centered under it. The drawer sides may have little or no visible metal hardware. | Clearance varies substantially by design; use the installation instructions rather than assuming side clearance. | Approximately 11–23 kg (25–50 lb) per pair for common concealed or light-duty designs. | May provide partial or full extension; some versions include integrated stops or adjustment clips. | Appropriate only when the drawer construction and slide rating are designed for the board’s weight and pull-out leverage. | Look underneath for locking clips or release mechanisms. Support the drawer before disengaging the clips. |
| Soft-Close Slide | The drawer slows during the final closing section. A damper or closing mechanism is built into the slide or mounted beneath the drawer. | Depends on whether the mechanism is side-mounted or concealed; measure the installed hardware. | Commonly about 23–45 kg (50–100 lb) per pair, but the soft-close mechanism may have a lower practical limit. | Full extension is common; the final closing action is controlled by a damper and spring mechanism. | Useful when the drawer must close quietly, but the board should be pushed in gently rather than slammed. | Locate the release levers or underside clips. Do not pull against the damper after the slide has reached its stop. |
| Heavy-Duty Slide | Slides are thicker, wider, or reinforced and may use multiple ball-bearing rows or a substantial mounting channel. | Often greater than standard side-mount clearance; measure both sides and compare with the slide documentation. | Approximately 45–91 kg (100–200 lb) per pair for common heavy-duty categories. | Usually full extension with high rigidity; some designs include a hold-in or locking feature. | May be suitable for a heavier pull-out ironing system, but the cabinet, drawer box, fasteners, and mounting surface must have matching strength. | Release methods vary. Remove stored items, support the drawer, and verify that locking levers are fully disengaged before pulling it out. |
| Non-Disconnect or Captive Slide | The drawer reaches a stop but has no visible lever, tab, clip, or lift-out position for normal removal. | Use the installed slide’s measured clearance; do not pry the drawer sideways. | Use only the exact rating printed in the installation literature; generic estimates are not reliable for this type. | Travel is limited by captive stops, and the drawer may not be designed for routine removal. | Suitable for an ironing board drawer only if the complete assembly is designed for the board and its operating forces. | Check for concealed screws, stop tabs, or cabinet-side fasteners. Remove hardware only after the drawer is fully supported. |
*Load figures are typical ranges for commonly sold residential slide categories, not a guaranteed rating for every installation. Always use the exact manufacturer’s load rating for the installed slide, and account for the drawer, ironing board, accessories, and dynamic pulling forces. Never exceed the lowest rating of the slides, drawer box, fasteners, or cabinet structure.